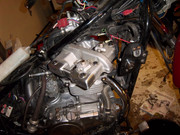
Maybe some day I will do a write up on this. Until then here's some pictures of how to take things apart. If you're not already aware this needs to be done on a cold soaked engine, ie it has set over night.
First you need to remove the seat. I'll assume you can figure this out.
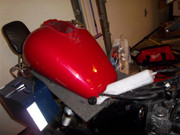
The tank is next:
-Remove the speedometer "dashboard" from the top of the tank. The bolt toward the rear of the bike secures this assembly. Remove the bolt and slide the assembly forward. Then unscrew the speedo cable and disconnect the two electrical connections.
-Remove the rear and front bolt securing the tank to the frame.
-Unhook the fuel line and vacuum line from the petcock. * MAKE SURE THE VALVE IS NOT ON PRIME!
-Remove the tank from the bike. I set a piece of foam rubber on the bike where the seat goes and then set the tank on this. that way I don't have to reroute the vent tubes when I put the tank back on. It's also worth mentioning it's easier to do this on a nearly empty tank.
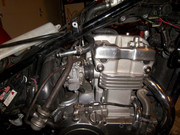
Remove debris from the spark plug wells:
-Remove the spark plug boots
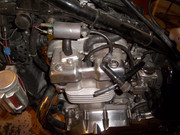
-Use compressed air to blow out any dirt, sand, or rocks. You don't want any of these falling into your coolant system when you remove the coolant tubes. Also you don't want this stuff in your combustion chamber if you happen to check your spark plugs while doing this. You don't need to remove the spark plug while checking the valve lash. Two things I highly recommend is replacing the hex head cap screws securing the coolant tubes with socket head cap screws. It's much easier to get an allen key in there than a socket. I have already previously done this as you can see in the picture.
next drain the coolant:
-Remove coolant overflow and dump it out. Do not re-install yet! Flop it out of the way. Already done in the picture above.
-Remove the RH side peg assembly (two bolts)
-Open coolant cap to let air in.
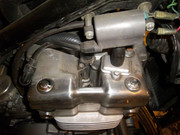
-Locate drain bolt as shown below and remove it.

*Note: Unless you like the smell of burning coolant, remember to rinse off the exhaust pipe when done.
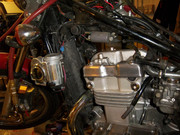
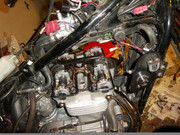
Start moving stuff out of the way:
-Pull the Kawasaki clean air system off the valve cover and out of the way. you see this dangling down the side of the bike from the air box in the picture. It's the long hose attached to a vacuum valve with two elbows to the valve cover.
-Remove the RH side ignition coil. BE CAREFUL! The coil mounts to the frame with two nuts embedded in rubber grommets. These electrically isolate the coil from the frame. These are easily destroyed which will then require a trip to the dealer for new ones.
-Remove the coolant tubes and pull them out of the way toward the back as shown. It's worth mentioning that these can be really difficult to remove. It may be a good idea to replace the o-rings and use a generous amount of dialectic grease when it's time to put things back together. The grease helps lube things going in and helps reduce the likelihood of corrosion making it difficult to remove the tubes after the next 6k miles. Stuff rags or paper towels in the coolant openings and spark plug hole if you have removed them. You really wouldn't want anything to fall in these openings.
-Remove the radiator fan (3 screws and a plug).
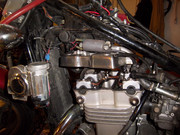
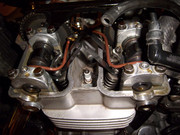
Remove the valve cover:
-Remove the valve cover bolts (3 on each side).
-Gently remove the valve cover. There are two locating guide pins near the center cam chain cavity. These pins carry air from the Kawasaki clean air system to the exhaust. When you have broken the seal, pry it up just enough to see if these pins stay with the head or valve cover. If they stay with the valve cover there is a real danger of having them fall out and down the cam chain cavity. If this happens you are really screwed and likely will have to disassemble the engine to get the pins out. If you foolishly decide you'll risk leaving them where ever they fell, you might as well order a new engine since the odds of destroying the engine are about the odds of not winning Mega Millions Lottery.
-If the locating pin stays with the valve cover carefully remove the pin from the valve cover and put it in the corresponding hole in the head.
-Lift valve cover up and slide it forward.
-Rotate front of valve cover toward RH side.
-Maneuver around the key wires and remove the valve cover out the RH side of the bike.
-Remove valve cover gasket. Remember those alignment pins? Be vary careful when removing the gasket not to pull the pins out of the head!
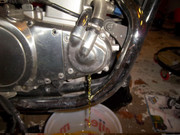
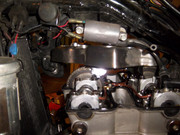
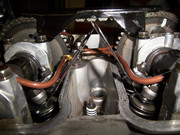
At this point you can check your valve clearances. The easy way to tell when the piston you are checking is at TDC compression by rotating the crank (with a socket) until both intake and exhaust cam lobes are pointing up. The crank rotates CW looking at it from the LH side of the bike. You don't want to turn the crank backwards since that will engage the starter clutch! It's best to have two feeler gauges to set the gap. Also as you can see you don't have to remove the copper oil lines to check clearances. If I have to make an adjustment I will remove them. I have never tried to adjust them with the copper lines still in.
OK so I went into more detail than I had anticipated. Feel free to point out any errors I have made above and don't blame me if you're dumb enuff to follow my instructions and break your bike

Consider this a supplement for the Vulcan 500 to the Ninja 500 valve adjustment procedure.